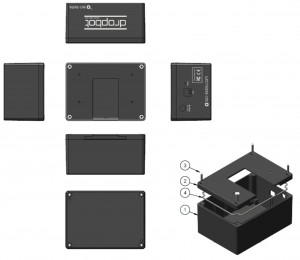
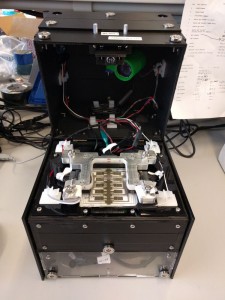
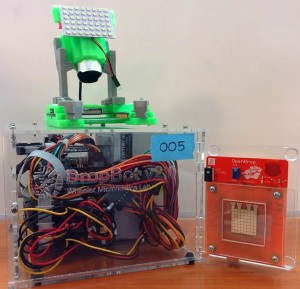
We’ve just placed orders for the PCBs and cases for the first batch of DropBot v3.0 systems and wanted to share a sneak peak of the rendered cases. Let us know what you think in the comments.
DropBot updates and EMC testing
We’ve been silent on the blog for the past few months, but fear not, DropBot development has not stalled. In fact, we’re going full steam ahead and getting ready to release the next (v3) DropBot system. There are a lot of updates (too many for a single blog post!) so I’ll stick to some highlights to get people caught up.
The Measles/Rubella field trial that happened last spring in Kenya was a resounding success ([1], [2]). Here’s a video documenting the project:
The journal publication should be coming out very soon and we’re currently gearing up for the next iteration, a follow-up study scheduled to take place in August/September in the Democratic Republic of the Congo.
There have also been some exciting new developments in the Wheeler Lab involving new methods for printing DMF chips. For those interested in chip fabrication, I would highly recommend checking out this paper.
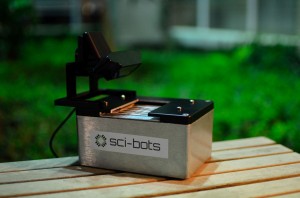
Finally, we’ve spun out a new company Sci-Bots Inc. that will make it easier for people to get their hands on a DropBot and start using DMF to solve important problems in biology and chemistry. We will provide more information soon in a future post, but here’s a sneak preview of a pre-production system.
What is EMC?
This remainder of this post is going to focus on EMC testing, which is something we’ve been thinking about a lot in our efforts (through Sci-Bots Inc.) to sell DropBots to people around the world. EMC stands for electromagnetic compatibility. EMC regulations apply broadly to anything containing electronics and are designed to ensure that any new electronic gizmo is not going to cause interference with other equipment (emissions standards) or be affected by RF noise, electrostatic discharges, etc. (immunity standards).
If you’re just posting designs online for people to build themselves, you probably don’t need to worry about such things; but if you want to actually sell a product, adhering to at least the emissions standards is mandatory in most jurisdictions (e.g., FCC in the US, Industry Canada). Selling to the European market requires compliance with both emission and immunity standards (along with several other additional requirements) to attach a CE mark.
Testing is expensive and takes a lot of time
Even in the simplest cases, emission testing can cost several thousand dollars (sometimes over ten thousand dollars for immunity testing). Selling non-compliant electronics could subject you to significant fines and it may be difficult to ship things across borders without documentation of compliance. This creates a significant barrier to small-scale production of hardware, especially when you consider that any non-trivial change/revision you make to your product requires a retest.
There’s also the issue of safety standards (e.g., UL, CSA, TUV, etc.). These are not required to legally sell a product, but they may be demanded by some customers (e.g., US government labs). Conformance with these standards requires some hefty fees and on-going testing (factory inspections, etc.). We have not pursued safety certification for DropBot yet (it is even more expensive than EMC), but we do take safety very seriously and are trying to make the new DropBot as safe as possible. For future versions, we will consider pursuing formal safety certification, since we expect it to become increasingly important as DMF matures and people want to start using DropBots in schools, hackerspaces, and in their homes.
How to meet EMC standards?
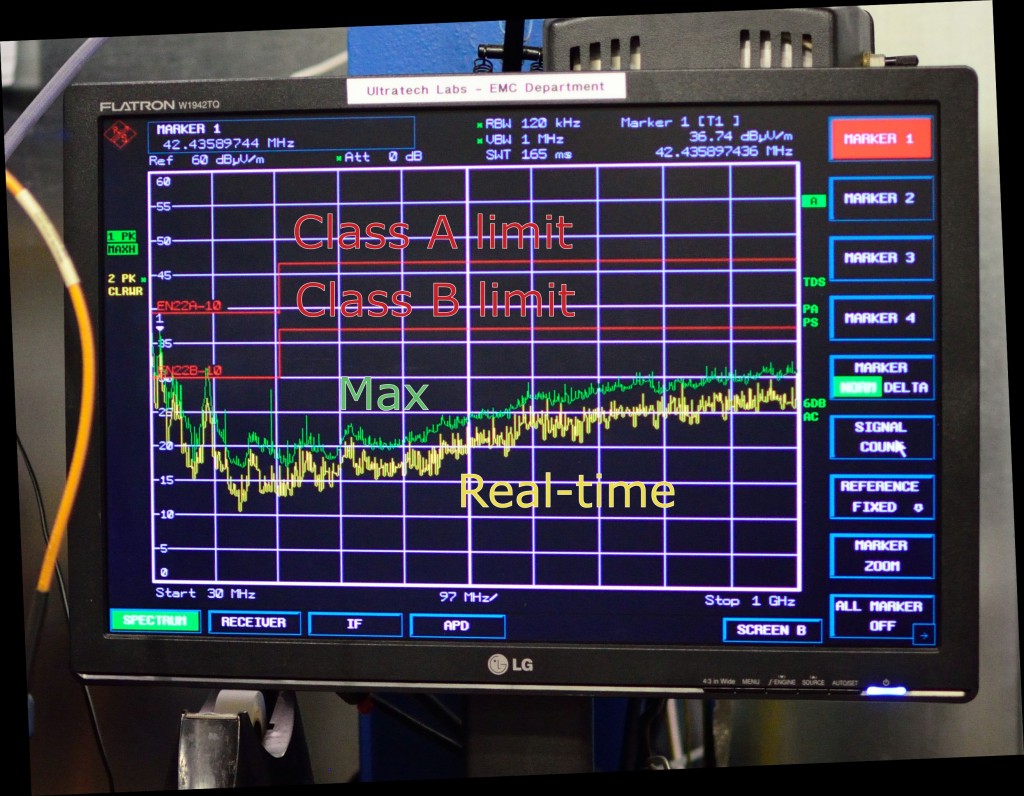
In a future post, we will go over some of the changes we made to DropBot v3 to address the EMC regulations. We haven’t yet finished all of the EMC testing, but we performed an emissions pre-scan earlier this week and it looks like the new DropBot v3 comfortably falls within class A limits (suitable for commercial/industrial customers). We are close to meeting the Class B requirements (home use) and have pretty good idea how to meet that stricter standard too (hint: USB cables are a major source of emissions).
Resources
I will close this post with some links to technical resources that we found useful in designing electronics for EMC compliance. EMC FastPass offers a free EMC design book (note that you need to register your email to download it) and also hosts a number of interesting articles/blog posts on the subject. The test lab we are currently working with here in Toronto, Canada (Ultratech) also has a very nice pdf/design guide that covers many common issues and solutions.
MicroDrop v2.0 release
We’ve just released MicroDrop v2.0. You can get it here. We’ve been using this version internally for a few months now, and we think you’re going to love it! It has a lot of new features, including:
- droplet path routing
- improved video registration
- a new profile manager which enables switching between multiple MicroDrop profile directories (e.g., plugins, devices, etc.) on the same computer
- an improved system for installing plugin dependencies and auto-updating
We’ve created a YouTube playlist showing some of the new droplet routing features.
There’s still a bit of work to do updating the documentation, but instructions for installation and migration from v1.0 are complete.
Please note that there are some important caveats for upgrading from v1.0, but we have posted a method for installing both versions side-by-side to help with the transition.
If you run into any problems with installation, please post them to the dev list and we’ll try to resolve them as quickly as possible.
Measles and Rubella field trial in Kenya
Last week, four members of the Wheeler Lab departed for Kenya to perform a field-validation study for measles and rubella using a new version of the DropBot. The new system (which we refer to as the Measles/Rubella-BOX or MR-BOX) is capable of performing four simultaneous sandwich ELISAs in about 40 minutes using a chemiluminescent readout. It detects light by measuring the current from a photomultiplier tube (PMT) using another piece of open-hardware developed in the Wheeler lab called the DStat. It also features an integrated amplifier, a magnet for performing bead-based separation, a webcam, LED lighting, and a humidity and temperature sensor. The assay is based on earlier work with Rubella and we’ve since added the capability to test for measles at the same time. We are using 100% low-cost, inkjet-printed DMF devices.
In preparation for this project, we’ve made significant updates to the Microdrop software, including path routing, new quality control tests, and lots of usability improvements. We hope to preview some of these features here on the blog in the coming weeks and we will release updated installers later this summer.
We’ll be testing 150 clinical samples at the Kakuma refugee camp over the next 3 weeks. Check out the video below for an introduction to the project, and if interested, follow our progress on twitter.
Sciex Analyst Control app and Microdrop plugin
We just released a Windows app called “AnalystControl” that can connect to the Sciex Analyst application (used to control auto samplers, mass spec, etc.) to start/stop queued acquisition batches.
The binary release of the “AnalystControl” application is available at:
https://github.com/wheeler-microfluidics/AnalystControl/releases/latest
The source code of the “AnalystControl” application is available at:
https://github.com/wheeler-microfluidics/AnalystControl
See below for instructions on how a) directly control start/stop of acquisitions in Analyst queue, and b) coordinate acquisition in a Microdrop protocol using “AnalystControl” and the analyst_remote_plugin Microdrop plugin.
Direct Queue control through AnalystControl
The AnalystControl app can be used to connect to the Sciex Analyst application to start/stop queued acquisition batches.
- Download and unzip AnalystControl release.
- Run “AnalystControl.exe” directly from unzipped directory (no installation necessary).
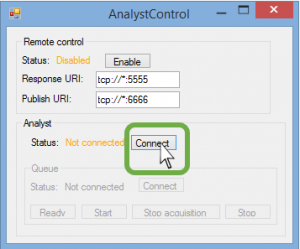
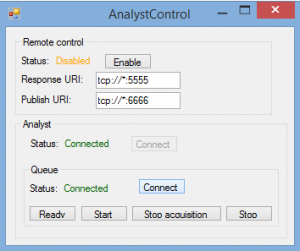
- Click “Connect” to connect to the “Analyst” application.
- Click “Connect” in the “Queue” area to connect to the queue manager.
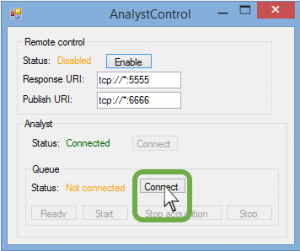
- Click one of the following buttons in the “Queue” area:
- “Ready”: Set queue state to “Ready”
- “Start”: Start queued acquisition
- “Stop acquisition”: Stop a running acquisition
- “Stop”: Stop queue (must call “Stop acquisition” first if acquisition is in progress)
Microdrop Plugin (analyst_remote_plugin)
To use the analyst_remote_plugin plugin for Microdrop
- Install
analyst_remote_pluginplugin by selectingFile > Manage plugins..., then selectingDownload plugin... - Create a Microdrop protocol and check the “Acquire” checkbox in at least one step.
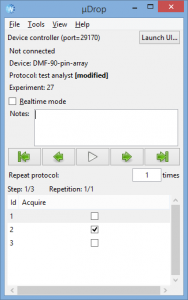
- Queue a batch in Analyst.
- Start the “AnalystControl” program if it is not already running.
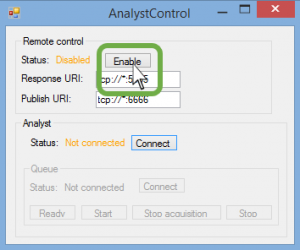
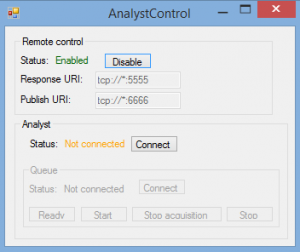
- Click enable in “Remote control” area of “AnalystControl” app to enable remote connection from Microdrop plugin.
- Start the protocol in Microdrop.
The Microdrop protocol will pause execution upon reaching the step where “Acquire” is checked. The Microdrop protocol will remained paused until the acquisition has completed, after which the protocol will be resumed.
DropBot, meet OpenDrop
Earlier this Spring, we were contacted by Urs Gaudenz from GaudiLabs and he told us about a low-cost, DIY-friendly DMF platform he was developing along with collaborators from the Bioflux project, called the OpenDrop.
The OpenDrop is a fully integrated device that is not much bigger than an Arduino Uno. It does not require any external high-voltage amplifier and uses MosFET transistors to control the state of each electrode (instead of the more expensive PhotoMOS chips used in the DropBot). These modifications reduce the system cost considerably, from ~$5,000USD down to a couple of hundred dollars, a level where many more people (e.g., DIY hobbyists) would be willing to build one just to play around with, which we view as a very exciting development!
Urs graciously sent us an OpenDrop, and we just finished writing firmware and a plugin that allow it to be controlled from Microdrop. We’ve added instructions on the Microdrop wiki.
The OpenDrop uses DC electric fields instead of AC (a simplification that drives a lot of cost savings) and does not perform any impedance-based sensing. It also uses a PCB-based electrode array that is covered by a removable film (Saran wrap), instead of removable devices. While this certainly works for moving drops around in an open plate configuration, it is unlikely to work in the more useful two-plate configuration (necessary for dispensing and splitting) unless an oil-filler is used. That being said, we think it should be possible to achieve many of the cost savings while maintaining most of the added functionality of the DropBot system, which is the focus of our current development efforts. In any case, we see the OpenDrop as a very exciting development that will bring more people into the open-source DMF community.
IPython notebook integration
We just published an update for Microdrop (v1.0.18) that adds an exciting new feature: IPython notebook integration. This provides a quick and easy way to dive in and explore data logged during the course of your experiments. This could be useful for custom analysis of one-off experiments, or you can save notebook templates so that you can quickly apply a common set of post-processing steps to future experiments. If you need tighter integration with Microdrop, it’s straightforward to transition these notebooks into Microdrop plugins.
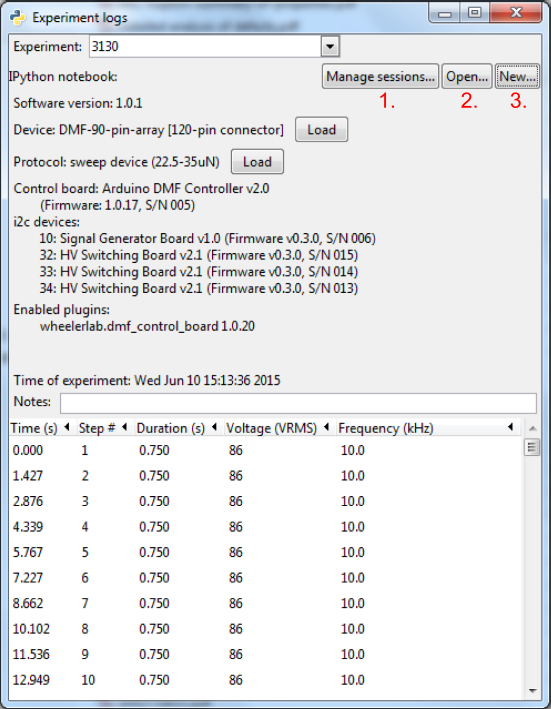
To access this feature, open the experiment log window from the menu item View/Experiment Logs and choose a log id from the drop down menu. There should be three new buttons : 1. Manage sessions..., 2. Open.. and 3. New... If you press the New... button, a file selection dialog will open in the Microdrop/notebooks folder. From here, you can choose a notebook template. We’ve provided two examples to get you started: “dump feedback results to csv.ipynb” and “Experiment log explorer.ipynb”.
If you choose one one of these templates, that file will be copied to your experiment log folder (i.e., “Microdrop/devices/device name/logs/log id/”) and an IPython notebook session will be launched in your default browser. To see an example of what one of these notebooks looks like, see this link. It demonstrates how you can dump feedback results to a *.csv file and plot drop velocity for a selection of steps in your protocol. After you’ve created a new notebook by copying a template (and optionally editing it), you can later open that notebook with the Open... button.
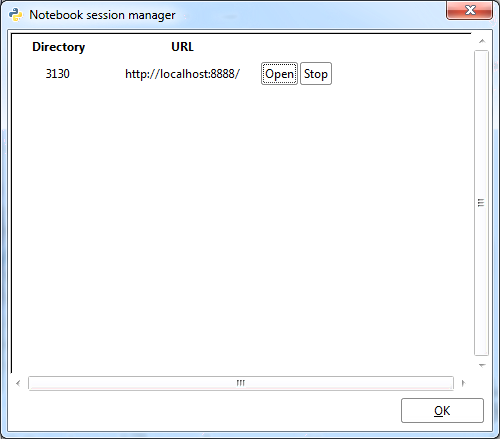
Note that each time you launch a new IPython notebook, it creates a new system process. These processes remain open until you exit from Microdrop, so if you create too many notebooks, it can cause a drain on your system due to high memory usage. The Manage sessions... button provides you with the ability to close down notebook sessions that you are no longer using by clicking on the Stop button next to the notebook you want to kill.
If you have questions/comments about this feature, please send them to the dev list.
Microdrop v1.0
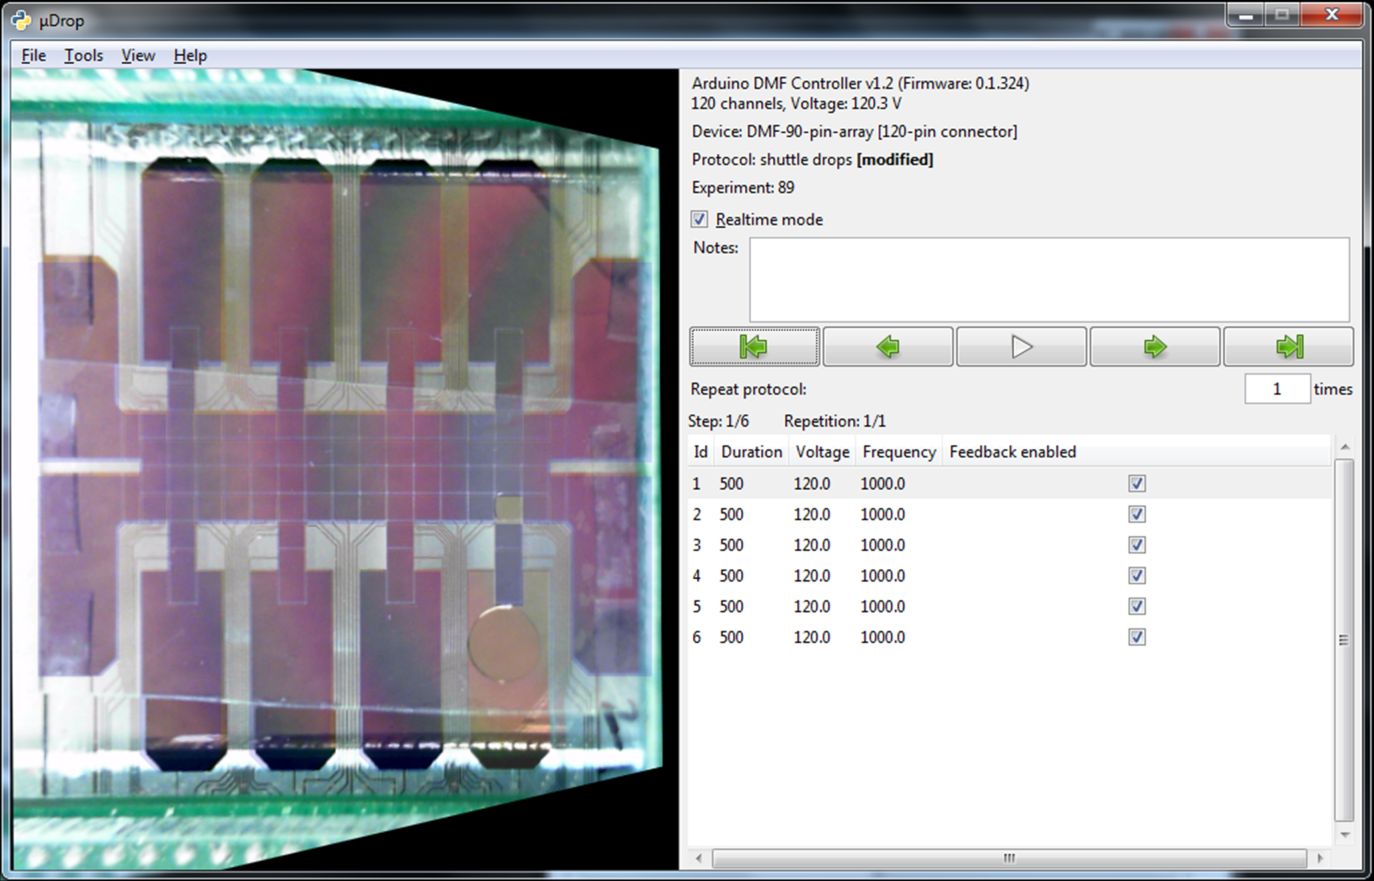 We’re happy to announce the release of Microdrop v1.0 (Windows installer). A list of changes can be found here. Note that if you have previously installed a pre 1.0 version, you should uninstall it before installing the latest version.
This release is also available as a self-extracting portable version which you can run from a folder on your computer or a USB thumb drive. This option does not require Administrator privileges and allows you to easily switch between multiple versions of the software on the same computer.
We’ve also released an update to the DMF control board plugin (which should update automatically, or you can manually update from the menu item “File/Manage plugins”). To see what’s new, check out the change log here.
If you experience any problems, please send a message to the dev list.
Always make sure that the amplifier is off when you launch Microdrop!
We’ve recently noticed strange things happening when connecting/re-connecting to the control board during an experiment (e.g., drops randomly moving on the device, electrolysis, etc.), and while testing out the new hardware calibration routines (e.g., several fried op-amps in the feedback circuit). We hooked up an oscilloscope to the system and ran some tests to figure out what was going on.
When you initiate a connection to the DropBot (e.g., by launching the Microdrop application), the control board pulls a pin on the ATX power supply low to turn it on. This provides power to the daughter boards (e.g., the signal-generator board and high-voltage switching boards), which then power-up and initialize. During the power-up of the signal-generator board, transient voltages appear on the output pin within the first ~200 ms; if the amplifier is on during this time, it can output voltages in excess of +/- 200 V.
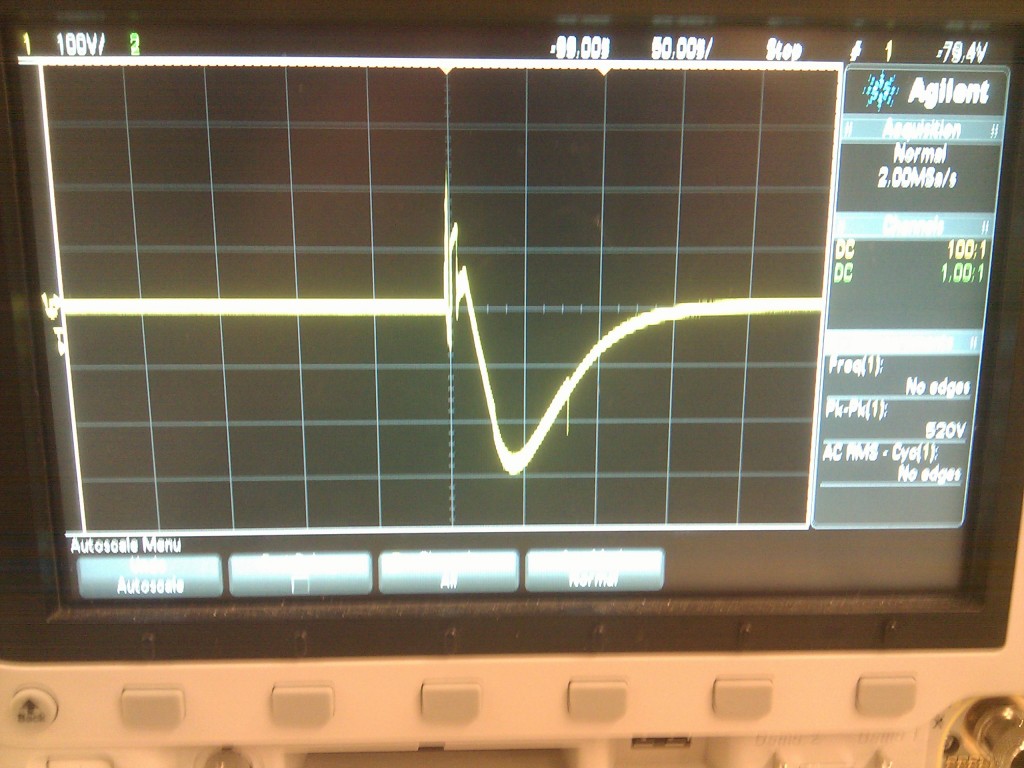
Oscilloscope screen showing high-voltage transients measured on the amplifier output during DropBot initialization. Each vertical line represents 100V.
Because the high-voltage switching boards are uninitialized at this point, high-voltage transients also appear on the outputs of all channels (though they are attenuated by roughly 50%).
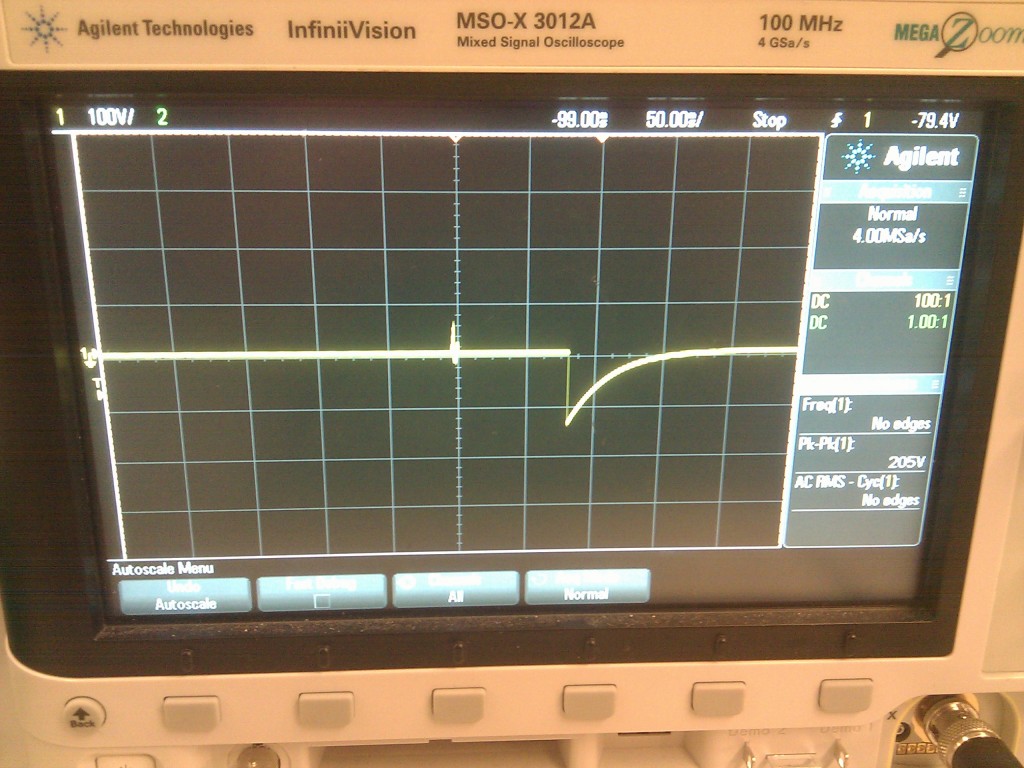
Oscilloscope screen showing high-voltage transients measured on channel 0 during DropBot initialization. Each vertical line represents 100V.
These transients can cause damage to a connected DMF device (e.g., dielectric breakdown, electrolysis, etc.) if it is loaded with liquid. They can also damage the control board‘s impedance measurement (feedback) circuit if the test board is connected, since this board contains many large capacitors which provide a low-impedance path to the feedback circuit. In fact, this scenario caused us to fry several op-amps on our control board, which helped us to identify the problem.
To summarize, if the amplifier is on when you connect to the control board, high voltages may be applied to all channels in the system for a brief period (< 200 ms). To prevent damage, always make sure that the amplifier is off when you launch the Microdrop application. As an added layer of safety, you should avoid loading liquids onto your DMF device until after you have launched Microdrop. This way, even if the amplifier is on, it will not cause any damage to your DMF device or to the feedback circuit.
This problem can be addressed in future designs through hardware modifications to the control board, signal-generator board and or/the high-voltage switching boards.
Preview of the Microdrop 1.0 release
Update 2015/03/18/: link to the portable v1.0rc0 instead of the earlier developer preview. This release candidate is considered stable for routine use; the only major change expected prior to v1.0 is the addition of a Windows installer.
We are getting set to release version 1.0 of the Micrdrop software as well as a couple of new hardware add-ons: (1) a test board and (2) an anti-aliasing filter shield. In combination, these improvements provide a simple method for users to quickly calibrate and benchmark their DropBot systems and to diagnose hardware problems. In addition, they significantly improve the accuracy of impedance-based measurements. We are in the process of upgrading our systems here to perform internal testing, but we thought we would share a preview of what’s in store.
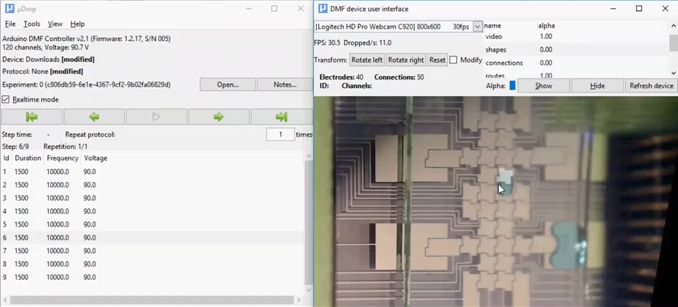
This first set of screenshots shows a wizard for calibrating the reference load resistors. Once calibrated, this allows the DropBot to monitor the high-voltage output from the amplifier.
This next wizard is for calibrating the circuit responsible for measuring device impedance. This process makes use of the previously mentioned test board, which is essentially just a bank of known reference capacitors connected between one of the switching boards and the feedback cable (i.e., in place of a DMF device).
This final set of screenshots shows a test routine for checking the high-voltage switching boards. This can be useful for quickly identifying faulty solid-state relays.
One of the other changes with the upcoming software release makes it possible to run Microdrop as a portable application (e.g., from a folder or USB thumb drive) without installing the software. We still plan to provide an installer, but this will make it possible to run multiple versions of Microdrop on the same computer (e.g., one “stable” version and one “experimental” version).
If you are feeling brave and want to try out the release preview, download and double-click on the self-extracting zip file , then double-click on the Microdrop.bat file. Be warned that this version may not be compatible with your old protocols/plugins (we are working on upgrade tools, etc.). You will also need to download the new control board plugin (change log); click on the menu item File/Manage plugins, click the Download plugin... button, select dmf_control_board from the list and click OK. Once you restart Microdrop, it should give you the option to flash the upgraded firmware. Note that if you want to go back to the previous firmware version, you will need to re-flash the control board and recalibrate.
In the new year, we will post an official release (with a Windows installer) and provide some additional details on the new hardware and software features. If you have any comments or questions about the release, please direct them to the development email list.

